by
 DJ Shirley
| Updated May 22, 2024
DJ Shirley
| Updated May 22, 2024
If your sales team has started to express they are feeling overwhelmed by the volume of leads they have to work through, it's time to begin mapping out how you will activate a lead scoring is a process into your CRM to better support your marketing and sales teams.
The goal of lead scoring is to help marketing and sales track and identify when a lead is ready to connect and have a serious conversation about moving forward with your offering.
Lead scoring helps rank your leads with a value that is based on various data points so your team can quickly identify the most promising customers in your pipeline. You can find the benefits of Lead Scoring in a previous article.
In this article, we will walk through how you structure and implement a lead scoring model in your HubSpot account.
This outline can be translated to other applications outside of HubSpot, but the walkthrough will focus on HubSpot’s Lead Scoring feature.
Steps to Set Up Your HubSpot Lead Scoring Model
(1) Identify Your Contact Criteria
Lead scoring is built around common criteria you have identified among contacts who have proven to be the best fit to connect with your sales team based on a range of traits, including:
- ICP - (Ideal Client Profile) typically looks at the contacts Industry, Revenue, Employee Count, Current Technology, etc.
- BANT - (Budget, Authority, Need, Timeline)
- Behavior - (Filling out high intent forms on the website, showcasing desired online behavior and engagement such as - interacting with emails, social posts, browsing certain areas on the website, etc.)
(2) Outline Your HubSpot Lead Scoring Model
Once your lead scoring criteria is outlined, you can begin building your model’s point system. With HubSpot lead scoring, you can use whatever point system is going to make the most sense for your team.
At Digitopia, we typically build a model that aims for 100 points. This means, when a contact hits 100 points, they have met the established criteria and are ready to connect with the sales team.
However, we have seen point systems that go to 10 or the high 100’s, and both worked well within the given organization.
Additionally, you need to determine if and how your lead score is going to be integrated into your CRMs automation and workflows. Once you know how the lead score will impact your automation and existing processes, you can better outline what factors actually need to be included in your lead score property of HubSpot.
Please note - There are many ways to integrate how your lead score impacts your existing process.
We recommend creating a simple resource outside of HubSpot to serve as an overview of your lead scoring model. This should also be your single source of truth to reference in the future when reviewing and optimizing your system.

This resource needs to provide you the following:
A clear overview of what information needs to be known about a contact and what behaviors they need to take to achieve a score of 100 so they can advance to the Sales team.
You can access a copy of the table above if you download our Technical Lifecycle Journey Map. The resource is free and one of the first resources we activate with clients.
Tips when building your HubSpot lead scoring model:
- Aim for simple but effective scoring (don’t overcomplicate in the beginning)
- Don’t just focus on adding points to a contact, it is just as important to add subtractors.
- Utilize HubSpot Lists - Create lists that identify relevant collections of contacts. For example - you can create a HubSpot list that identifies contacts who meet your ICP instead of adding individual point values to each of the elements that make up your ICP.
Once you have your overview complete, you can add the HubSpot.
How to setup lead scoring in HubSpot
You will find default HubSpot lead scoring feature in your HubSpot portal by going to:
Settings -> Data Management -> Properties
The fastest way to find the default HubSpot Lead Scoring property is to type “Score” via the search bar feature. Note, the default property name will be "HubSpot Score".
Click on the property to open and begin to add your criteria, remember to add both positive and negative point criteria to your property.
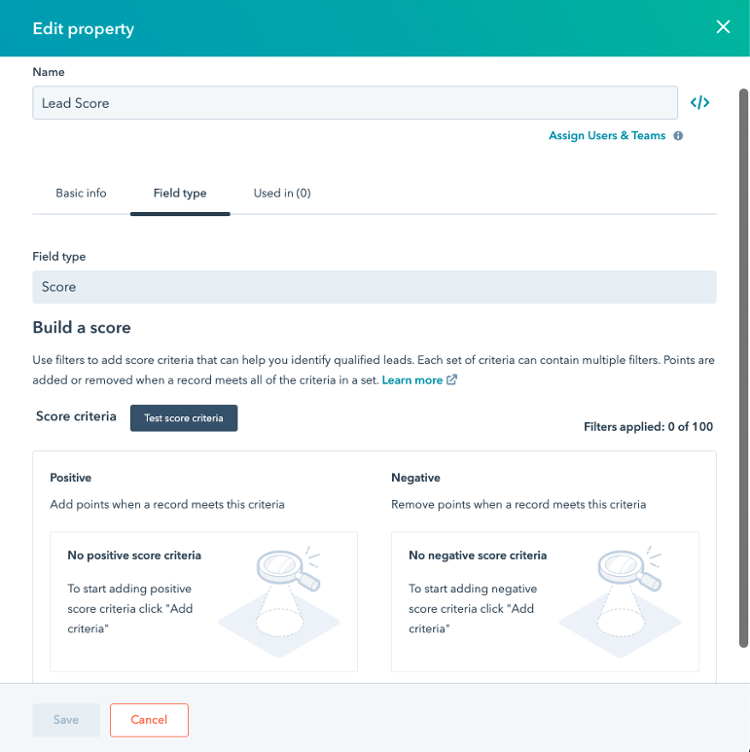
Don’t forget to use the “Test Contact” feature?
Activate Lead Scoring System
Once you have built out the Lead Score property, you can incorporate it into your automation and workflows as needed.
Tips & Recommendations:
- Encourage your team to add the score property field to their default contact view in HubSpot so they can quickly see a contact's score with just a glance.
- You can create dynamic lists to quickly reference contacts who fall within designated ranges. For example, you can create lists that showcase:
- Contacts with a score over 100 points
- Contacts with a score between 80 and 99
- Etc.
Review and Optimize Lead Scoring
It’s important to take your time and think through the architecture as you build out and integrate your lead scoring model. When implemented correctly, you save your sales team time and effort. Plus, you help make sure your prospects are having the right conversations at the right time. That said, you will need to continually audit and optimize your lead score.
How often should you review your Lead Scoring Model?
One of the biggest hurdles to setting up a lead scoring model occurs when the customer lifecycle journey is not clear across the organization. One of the first resources we encourage clients to explore when looking into lead scoring is ensuring they have a complete Technical Lifecycle Journey Map.